
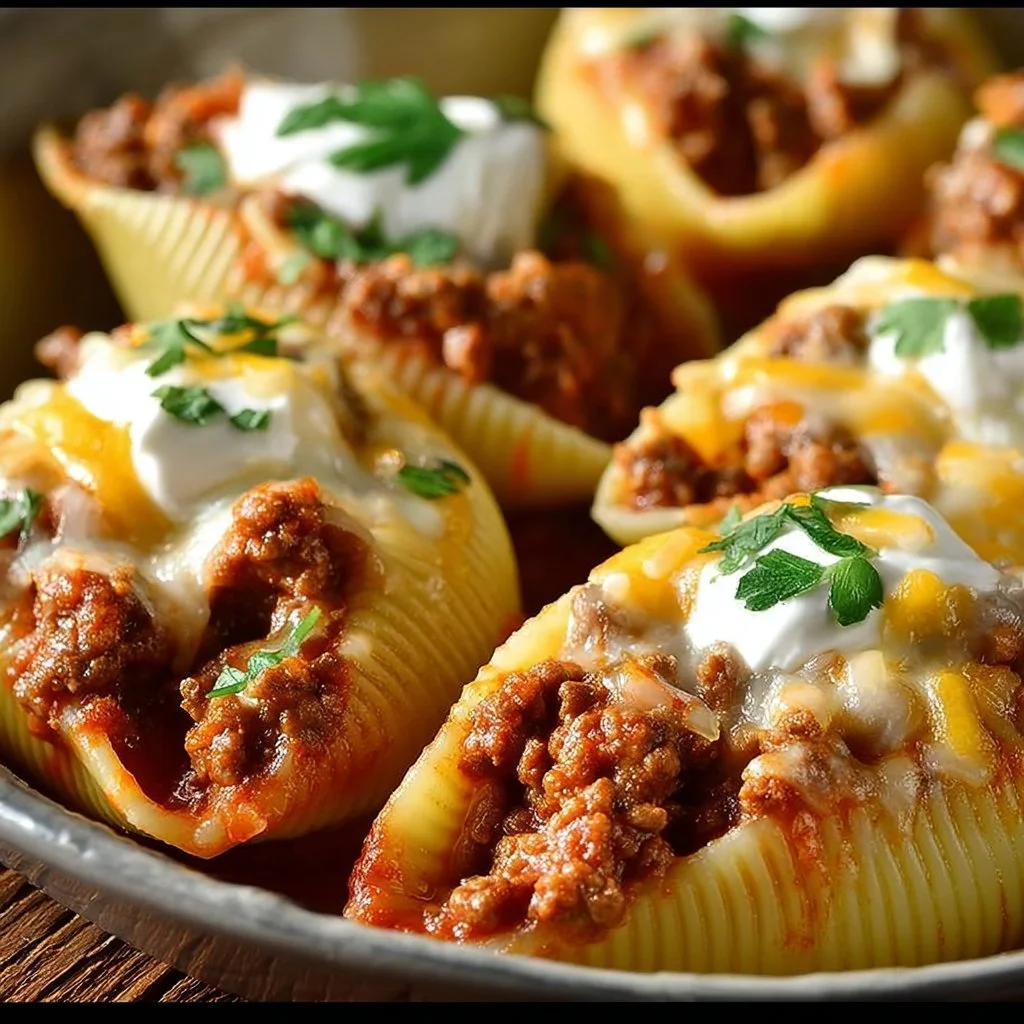
Creamy Beef Taco Stuffed Shells
When you’re looking for a dish that combines comfort, flavor, and ease, look no further than Creamy Beef Taco Stuffed Shells. Imagine coming home after a long day, greeted by the savory aromas of seasoned ground beef mingling with cream and spices wafting through your house. The vibrant colors of the rich red tomatoes, creamy cheese, and fresh cilantro burst against the neutral pasta shells, making this meal as pleasing to the eye as it is to the palate. Best of all, these pasta shells are generously filled, creating a hearty, satisfying dish that your family will devour with enthusiasm. Perfect for weeknight dinners or larger gatherings, Creamy Beef Taco Stuffed Shells will quickly become a go-to recipe in your kitchen. Dive in and let me show you how to whip up this delightful meal that’s packed with love and flavor!
What Is this recipe?
Creamy Beef Taco Stuffed Shells blend the beloved flavors of classic Mexican tacos with the comforting texture of pasta. Originating from the convergence of Mexican and Italian cuisine, this dish showcases how two culinary traditions can inspire a delightful meal that’s truly unique. Using jumbo pasta shells as vessels, you can fill them with a creamy beef mixture infused with aromatic spices, resembling traditional taco flavors. Typically served with a side of fresh greens or a colorful salad, this dish elevates any dinner table, transforming a simple meal into an impressive spread.
This dish shines not just because of its flavors but also due to its versatility. You can customize the recipe by using a slow cooker, which allows the meat to simmer until tender and flavorful, or an air fryer for a crispy outer layer on the stuffed shells. Whether you’re making it for a family gathering or a cozy weeknight dinner, the preparation method you choose can enhance flavors and textures, making it even more enjoyable. Plus, with a few simple adjustments, it’s effortlessly adaptable to suit every palate.
Why You’ll Love This Recipe
Creamy Beef Taco Stuffed Shells offer so many advantages that make them a must-try for any home cook.
-
Ease of preparation: This dish requires minimal cooking skills, making it perfect for both novices and seasoned cooks. The steps are clearly laid out, ensuring anyone can follow along effortlessly.
-
Flavor complexity: The combination of creamy sauce, seasoned beef, and zesty toppings creates a symphony of flavors. Each bite offers a delightful balance of richness and zest that keeps you coming back for more.
-
Family-friendly or kid-approved: With a mild flavor profile and cheesy goodness, kids will love digging into these shells. Plus, they can help in the assembly, making it a fun family cooking activity.
-
Budget-friendly or ingredient flexibility: Most ingredients can be found at your local grocery store, and you can customize the stuffing based on what you have on hand. Ground turkey or even vegetarian proteins can seamlessly substitute for beef.
Your Guide to Making Creamy Beef Taco Stuffed Shells at Home
This recipe’s straightforward approach makes it easy to prepare this tasty dish, perfect for busy weeknights. You will need a large pot for boiling shells, a skillet for cooking the filling, and a baking dish to assemble everything. The entire process takes about 30 minutes of prep time and 25 minutes in the oven, totaling around 55 minutes from start to finish.
Ingredients
- Jumbo pasta shells (12-15 pieces): These will hold all of the delicious filling. Look for the largest shells to ensure easy stuffing.
- Ground beef (1 lb): The star of the filling, providing essential flavor and protein. You can substitute it with turkey or even a plant-based protein for variety.
- Cream cheese (8 oz): This adds creaminess to the filling, ensuring it stays moist and packs a punch of flavor.
- Salsa (1 cup): Adds freshness and zest, helping to incorporate a classic taco feel. Choose mild or spicy depending on your preference.
- Shredded cheese (1 cup): A blend of cheddar and Monterey Jack adds gooeyness to the dish. You can use pre-shredded cheese for convenience.
- Taco seasoning (1 packet): This seasoning mix brings all the necessary spices together, providing an easy and consistent flavor profile.
- Fresh cilantro (for garnish): Adds a pop of color and freshness. If cilantro isn’t your thing, consider green onions or parsley as alternatives.
Directions
-
Preheat the oven: Set your oven to 350°F (175°C). This will ensure it’s hot enough to melt the cheese and warm the shells perfectly.
-
Cook the shells: In a large pot of salted boiling water, cook the jumbo pasta shells according to the package instructions until al dente, usually around 9-11 minutes. Drain and set aside to cool slightly while you prepare the filling.
-
Brown the beef: In a large skillet over medium heat, add the ground beef. Cook until browned, breaking it apart with a spatula, about 5-7 minutes. Drain excess fat, if needed.
-
Add creaminess: Reduce heat to low and stir in the cream cheese, salsa, and taco seasoning. Mix until the cream cheese is fully melted and integrated, creating a deliciously creamy mixture. The aromas will start to entice you, making your mouth water with anticipation.
-
Stuff the shells: Using a spoon, carefully fill each shell with the beef mixture. Place them in a greased baking dish, open-side up. Don’t be afraid to pack them generously; you want these to be hearty!
-
Top with cheese: Once all shells are stuffed, sprinkle the shredded cheese evenly on top. Make sure each shell gets its fair share of cheesy goodness, as it will melt into a beautiful, bubbly layer.
-
Bake: Cover the dish with aluminum foil and bake in the preheated oven for 20 minutes. After that, remove the foil and bake an additional 5-10 minutes until the cheese is melted and slightly golden. The aroma of melted cheese and seasoned beef wafting through your kitchen will be almost irresistible!
Delicious Pairings for Creamy Beef Taco Stuffed Shells
These stuffed shells are best served warm straight from the oven, but there are so many delicious sides that enhance this dish. Pair them with a light side salad tossed in a citrus vinaigrette for a refreshing contrast to the rich filling. The acidity of the citrus dressing brightens up the meal, balancing the creamy aspects of the shells. Another great option is to serve them alongside crunchy tortilla chips with freshly made guacamole or salsa. The contrasting textures add an exciting twist to your meal.
If you’re feeling adventurous, you can even serve these stuffed shells with a side of Mexican Street Corn (Elote). The sweetness of the corn, combined with cheese and lime, complements the savory flavors beautifully. Don’t forget drinks like a homemade fruit-infused lemonade or even classic margaritas for those looking to add an adult touch to dinner. Each of these pairings amplifies the meal’s satisfaction, creating a truly memorable dining experience.
Pro Tips for the Best Creamy Beef Taco Stuffed Shells
Creating the perfect Creamy Beef Taco Stuffed Shells involves a few essential techniques that will elevate your dish.
-
Ingredient swaps or upgrades: Consider using high-quality ground meat for richer flavors; grass-fed beef or fresh ground turkey can change the dish significantly. If vegetarian, swap the beef with lentils or black beans for a healthy alternative.
-
Spice adjustments: Feel free to enhance the flavor by adding extra spices like cumin, paprika, or chili powder when cooking the beef. You can adjust the spice level based on your family’s preferences, making this dish as mild or spicy as you’d like.
-
Equipment advice: If you have a large steamer basket, it can be a great alternative for cooking the shells, ensuring they don’t break while boiling. Be gentle!
-
Storage tips: Prepare and stuff the shells ahead of time, cover them tightly, and store them in the fridge for up to 24 hours before baking. Just add a few extra minutes to the baking time if taken from the fridge.
-
Mistakes to avoid: Make sure not to overcook the pasta shells, as they will lose their shape and structure. Al dente is key here because they’ll continue cooking in the oven. Also, don’t skip covering the dish initially while baking; this helps melt the cheese evenly.
Variations & Add-Ins
If you’d like to switch things up, consider these fun variations for Creamy Beef Taco Stuffed Shells.
-
Chicken and Spinach: Swap the ground beef for cooked shredded chicken and add a handful of spinach to the filling for an extra nutrient boost. The mild flavors still cater to everyone’s tastes.
-
Zesty Black Bean Option: For a vegetarian twist, replace the beef with black beans mixed with corn and spices. Balance the creaminess with a bit of sour cream instead of cream cheese.
-
Taco-Style Toppings: Top your stuffed shells with traditional taco toppings like diced tomatoes, jalapeños, or avocado before serving for a fresh crunch.
-
Spicy Chipotle Remix: Mix chopped chipotle peppers in adobo sauce into your beef filling for an extra kick. This swap introduces a smoky depth that’s incredibly flavorful.
Kid-Friendly Version
To make Creamy Beef Taco Stuffed Shells even more kid-friendly, aim for a mild flavor profile by reducing the spices and the amount of salsa you use. Instead, opt for sweet corn and diced bell peppers as part of the filling, enhancing the sweetness without overpowering their taste buds. For the topping, consider a sprinkle of cheese without any extras that might feel too adventurous. You could even let the kids help by decorating their own stuffed shells with toppings like shredded cheese or lettuce to engage them in the cooking process.
Storing and Reheating Tips
When it comes to storing leftover Creamy Beef Taco Stuffed Shells, refrigerate them in an airtight container within two hours of cooking to maintain freshness. They can last up to three days in the refrigerator. It’s best to store the filled shells without the sauce on top to prevent sogginess, adding the cheese layer only right before reheating.
For reheating, the oven works best to regain that freshly baked texture. Preheat your oven to 350°F (175°C), cover the dish with foil, and heat for about 15-20 minutes. If using the microwave, heat in short intervals, checking frequently to avoid drying out the shells. You can freeze cooked shells as well; just make sure to wrap them tightly in plastic wrap and then aluminum foil. When ready to eat, simply thaw them in the fridge overnight before reheating.
FAQs
Can I make Creamy Beef Taco Stuffed Shells ahead of time?
Absolutely! You can prepare and stuff the shells a day in advance. Just keep them covered in the fridge and bake them right before serving for a delicious, hassle-free meal.
What can I substitute for ground beef?
Ground turkey, chicken, or even a plant-based meat substitute would work wonderfully in this recipe. If you want to keep it vegetarian, black beans or lentils are great options.
Can I use regular pasta instead of jumbo shells?
While jumbo shells are ideal for this recipe, you can use any pasta shape you prefer. Just adjust the cooking time accordingly based on the pasta you choose.
How can I spice it up?
Add jalapeños or diced green chilies to your beef mixture for some heat! You can also sprinkle red pepper flakes on top before serving for additional heat.
How long do leftovers last?
Stored in an airtight container, leftovers can last in the fridge for up to three days. Make sure to keep them covered to maintain their moisture.
In conclusion, Creamy Beef Taco Stuffed Shells offer an inviting combination of flavor, ease, and creativity that will have everyone craving seconds. The merging of pasta and taco delights guarantees a comforting meal that appeals to all ages. So, gather your ingredients today and elevate your dinner routine—try it tonight and let me know how it turned out!

Creamy Beef Taco Stuffed Shells
Ingredients
Method
- Preheat your oven to 350°F (175°C).
- In a large pot of salted boiling water, cook the jumbo pasta shells according to package instructions until al dente, about 9-11 minutes. Drain and set aside.
- In a large skillet over medium heat, add the ground beef and cook until browned, about 5-7 minutes. Drain excess fat if needed.
- Reduce heat to low and stir in the cream cheese, salsa, and taco seasoning. Mix until cream cheese is fully melted and integrated.
- Carefully fill each shell with the beef mixture using a spoon. Place them in a greased baking dish, open-side up.
- Sprinkle the shredded cheese evenly on top.
- Cover the dish with aluminum foil and bake for 20 minutes.
- Remove the foil and bake an additional 5-10 minutes until the cheese is melted and slightly golden.