

Easter Bunny Poke Cake
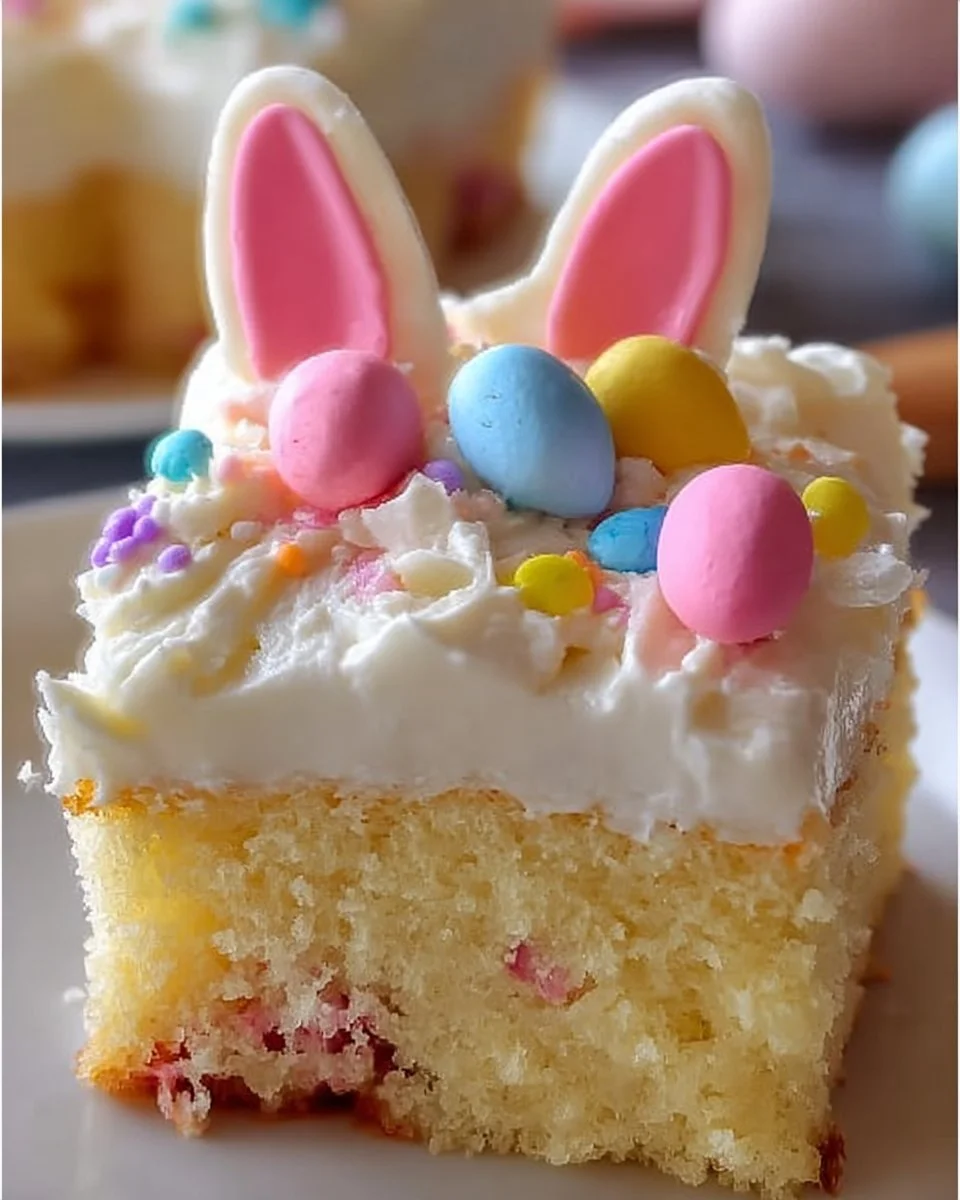
This Easter Bunny Poke Cake is a playful, crowd-pleasing dessert that pairs tender cake with creamy pudding and fluffy whipped topping. The texture starts with a soft white or yellow cake, punctuated by pockets of vanilla pudding that keep each bite moist and slightly custardy. The whipped topping creates a light, cloud-like finish while pastel jelly beans or candy-coated chocolates add a sweet, crunchy contrast. The shredded coconut, dyed pink or left white, mimics fluffy bunny ears and gives a hint of chew and subtle coconut aroma. This recipe is ideal for spring gatherings, holiday potlucks, or any time you want an easy, festive centerpiece that looks charming but comes together with minimal fuss. It is family friendly, simple enough for bakers of all levels, and perfect for decorating with kids.
Ingredients
- 1 box (18.25 oz) white or yellow cake mix, the base for the cake, choose white for a milder flavor or yellow for a richer, buttery note.
- 3 large eggs, provide structure and moisture to the cake batter.
- 1 cup water, used to dissolve the cake mix and create the proper batter consistency.
- 1/2 cup vegetable oil, keeps the cake tender and moist.
- 1 package (3.4 oz) instant vanilla pudding mix, adds creamy vanilla pockets when poured into the cake holes.
- 2 cups cold milk, required to whisk with the pudding mix until it thickens. Cold milk helps the pudding set properly.
- 1 container (8 oz) whipped topping, thawed, brings a light, creamy finish to the cake.
- Pastel-colored jelly beans or candy-coated chocolates, for festive decoration and a sweet crunch.
- 1 cup shredded coconut, dyed pink or left white, used to shape bunny ears and add texture.
- Optional: Candy eyes, licorice strips, or other decorations, for customizing the bunny face and extra details.
Step-by-step Instructions
- Preheat your oven to 350°F (175°C) and grease a 9×13-inch baking dish. Lightly greasing the pan helps the cake release cleanly.
- In a large bowl, combine the cake mix, 3 large eggs, 1 cup water, and 1/2 cup vegetable oil. Mix until the batter is smooth and uniform. Avoid overmixing once the dry ingredients are hydrated.
- Pour the batter into the prepared 9×13-inch dish and bake according to the package instructions, about 25 to 30 minutes. Insert a toothpick in the center; it should come out mostly clean.
- Let the cake cool for 10 minutes in the pan. After 10 minutes, use the handle of a wooden spoon to poke holes all over the surface of the warm cake. Aim for holes spaced about 1 inch apart so the pudding can seep in.
- In a separate bowl, whisk the 3.4 oz instant vanilla pudding mix with 2 cups cold milk until the pudding thickens. Immediately pour the pudding evenly over the cake, guiding it into the holes so the cake absorbs the pudding. A spatula can help spread it gently.
- Refrigerate the pudding‑filled cake for 1 hour to let the pudding set and the flavors meld. Chilling improves texture and makes the cake easier to frost.
- After the hour, spread the 8 oz container of thawed whipped topping evenly over the chilled cake. Use an offset spatula or the back of a spoon for a smooth finish.
- Decorate the cake with pastel-colored jelly beans or candy-coated chocolates. Shape 1 cup shredded coconut into bunny ears and place them on the cake. Add optional candy eyes, licorice strips, or other decorations to create a bunny face. Be gentle when pressing decorations into the whipped topping so they hold without sinking.
- Chill the decorated cake for an additional 30 minutes before serving to let everything set. Slice and enjoy chilled.
Recipe Details
- Prep Time: 15 minutes
- Cook Time: 25 to 30 minutes
- Total Time: About 2 hours 10 minutes, including chilling time
- Servings: 12
- Calories: Approximately 350 calories per serving
Tips, Storage & Variations
-
Tips
- Use a wooden spoon handle or the end of a rolling pin to make even holes about 1 inch apart for best pudding distribution.
- Make sure the pudding is fully thickened before pouring so it fills the holes instead of running off.
- Chill the cake uncovered for the first hour, then cover loosely with plastic wrap during the final chill to protect decorations.
-
Storage and Freezing
- Store the finished cake covered in the refrigerator for up to 3 days.
- For longer storage, you can freeze unfrosted slices after baking and cooling. Wrap slices tightly and freeze up to 1 month. Thaw in the refrigerator, then add whipped topping and decorations just before serving.
-
Variations using existing ingredients only
- Swap the cake mix between white or yellow to change the base flavor.
- Press some pastel jelly beans or candy-coated chocolates lightly into the pudding before chilling for pockets of candy inside.
- Use the shredded coconut white or dye it pink to create different bunny ear looks.
- Use candy eyes and licorice strips to vary the bunny face design for a group of smaller cakes or cupcakes.
FAQ
-
How long do I chill the cake before serving?
Chill the cake 1 hour after adding the pudding, then an additional 30 minutes after frosting and decorating. -
Can I use homemade pudding instead of instant?
Yes, but instant vanilla pudding is recommended for quick setting and easy texture. -
Do I have to poke holes evenly?
Even spacing, about 1 inch apart, gives the most consistent pudding distribution. -
Can I make this ahead of time?
Yes, assemble and chill up to one day in advance for best freshness. -
Is the shredded coconut necessary?
The coconut creates the bunny ear effect, but you can leave it off if preferred. -
How many servings does the recipe yield?
The cake serves about 12 people, depending on slice size.
People Also Ask
-
What is a poke cake?
A poke cake is a baked cake where holes are made in the surface and a liquid topping, like pudding or syrup, is poured over so it soaks into the cake. -
Can I use low-fat milk for the pudding?
Yes, low-fat or skim milk will work, but the pudding texture may be slightly lighter. -
Will the whipped topping hold up at a party?
Whipped topping stays stable when chilled, but keep the cake refrigerated until serving for best results. -
How do I dye shredded coconut pink?
Toss coconut with a few drops of food coloring until evenly coated, then spread on a plate to dry briefly. -
Can I make mini versions for individual servings?
Yes, bake in smaller pans or muffin tins and follow the same poking, pudding, and decorating steps. -
What is the best way to cut neat slices?
Use a sharp knife warmed in hot water and wiped dry between cuts for clean edges.
Conclusion
This Easter Bunny Poke Cake is an easy, festive dessert that combines soft cake, creamy pudding, and playful decorations to delight family and guests. For more inspiration on variations and serving ideas, you can view a similar take on the concept at Easter Poke Cake – Wishes and Dishes and another version at Easter Poke Cake – OMG Chocolate Desserts. I hope you enjoy making and sharing this cheerful cake, and that it becomes a favorite at your spring celebrations.

Easter Bunny Poke Cake
Ingredients
Method
- Preheat your oven to 350°F (175°C) and grease a 9×13-inch baking dish.
- In a large bowl, combine the cake mix, 3 large eggs, 1 cup water, and 1/2 cup vegetable oil. Mix until the batter is smooth and uniform.
- Pour the batter into the prepared dish and bake according to package instructions, about 25 to 30 minutes.
- Let the cake cool for 10 minutes in the pan.
- Poke holes all over the surface of the warm cake using the handle of a wooden spoon, about 1 inch apart.
- In a separate bowl, whisk the pudding mix with 2 cups cold milk until thickened, then pour evenly over the cake.
- Refrigerate the pudding-filled cake for 1 hour.
- Spread the thawed whipped topping evenly over the chilled cake.
- Decorate with pastel-colored jelly beans or candy-coated chocolates.
- Shape shredded coconut into bunny ears and place on the cake.
- Add optional candy eyes or other decorations to create a bunny face.
- Chill the decorated cake for an additional 30 minutes before serving.